Finances in the Making Music Platform

This guidance specifically covers Finances in the Making Music Platform. Before reading this, please ensure that you have read our help guide on Getting Started with your Making Music Platform.

All of the Making Music Platform help guides and latest Platform News can be found on the MM Platform Service Hub page.

You can also download and read the full Finances in the Making Music Platform helpguide in PDF format.

MEMBER INVOICING AND GIFT AID REPORTING

Setting up member invoicing

For all the set-up instructions below, ensure that you are logged into your Making Music Platform with a "Webmaster" level of access.

1.  Enter your fee structure

The first step in configuring member invoices is to enter your fee structure - the amount of money that each member pays on a regular basis, for each type of member.

You will most likely have several types of members, for example:  Full, Junior/Student, Senior, Associate, or Life.  Some or all of these will pay fees.  Some of your members may pay annually, others quarterly, monthly, or even weekly.  You must enter the amount paid for each of these member types for each of these periods.

Note: automatic membership invoicing is simplest if your members pay a fixed fee at regular periods (e.g. weekly, monthly, quarterly). This can raise an issue for groups who invoice termly, as often terms vary in length and don’t begin at regular points in the calendar year.

However, your MM Platform can handle automatic termly invoicing. You still need to set it up as descirbed below, but there are some things to be aware of. See our Termly and non-traditional fee structures help guide for more information.

To set up your fee structure...

  1. Click on the Admin link in the top-right corner to display the Administration Dashboard
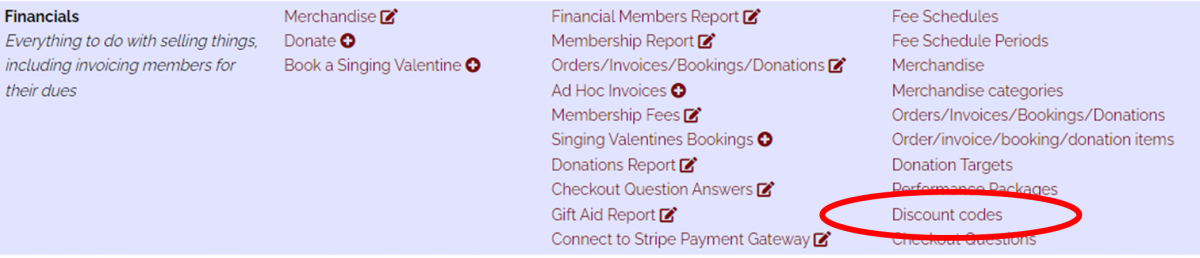
  2. Scroll down to the Financials heading, and click on the Membership Fees link to the right of this in the Admin Pages column
  3. Enter an amount for each type of member, for each time period
  4. Click the Save button

Notes:

  • If you leave a box at £0.00, then any members in the system that have that combination of fees type and schedule will not be able to be invoiced automatically by the system
  • If you need to change the fee type or fee schedule options available, please contact Making Music

2.  Enable the Invoicing module and set up payment options

Before member invoices can be generated from within the website, the Invoicing module must be enabled.  You must also select at least one payment method.  The payment methods available are:

  • Credit card via a secure payment gateway.  When a member uses this option to pay their invoice, they remain on your website for the entire process (unlike PayPal, below). Making Music Platform currently has integrated support for Stripe.  Please refer to our Payment gateways compared for more information.
  • Credit card via PayPal.  Note that your group must have a PayPal account in order to enable this payment method.  These are free to set up, but note that PayPal takes fees on every transaction.  One of the benefits of enabling this payment method is that when the member pays their invoice via the website, their membership is automatically renewed once the payment is completed.
  • Internet Bank Transfer.  Your bank account details are displayed to members when they received their invoice.  They make a manual transfer via their own Internet banking system, and when your treasurer/membership manager sees the payment in your group's bank account, they then manually mark the invoice as paid, and the member's membership is automatically renewed.
  • Cheque/Money Order.  Your postal address is displayed to members when they received their invoice.  They post a cheque, and when your treasurer/membership manager receives it, they then manually mark the invoice as paid, and the member's membership is automatically renewed.

To enable the invoicing module and set up payment options...

  1. Click the "cog" icon in the top-right corner of the site
  2. On the Website Setup and Configuration page, click the cog icon next to "Making Music Platform"
  3. Click the Configuration tab
  4. Tick the box at the top of the tab called Online Invoices/Orders/Tickets/Donations
  5. Click the Payments tab
  6. Tick the box at the top of the tab called Use the website to create and send invoices
    for membership renewals?
  7. Enter/adjust the Invoice Terms (number of days)
  8. Further down the same tab, enter the details of at least one payment method.  For example, the bank account instructions may look something like this...

    Please pay funds into the following account:

    Bank: First Bank of Making Music
    BSB: 123456
    Account name: My Excellent Group Inc.
    Account number: 12345678

    ...while the cheque/money order instructions may look like this...

    Please make cheques payable to My Excellent Group Inc.
    and post to:

    My Excellent Group Inc.
    PO BOX 9876
    Mytown SA 1234

  9. If you wish to allow members to pay for invoices securely using a credit card, please refer to our Payment gateways compared for more information
  10. Click Save at the bottom

3.  Nominate the person/position responsible for handling invoices

In most groups, there is one person that is responsible for creating and sending invoices, as well as being notified of payments of such invoices.  In Making Music Platform, you must nominate who this person is before invoices can be sent.  This is done by selecting the "position" that the person holds, not the person themselves.  That way whenever a new person takes over that position, the system continues to function without modification.

It may be necessary to first create the "position" and assign a member to it.  Check the Officers or Management Team page (or look in the "Positions" database).  If the position doesn't exist, create it.  Ensure that a member is assigned to it. Then...

  1. Click the "cog" icon in the top-right corner of the site
  2. On the Website Setup and Configuration page, click the cog icon next to "Making Music Platform"
  3. Click the People tab
  4. In the Send invoices and receive payment notifications drop-down list, select the appropriate position
  5. Click Save at the bottom

Next, ensure that this person has administration rights over the invoicing system...

  1. Click on the Admin link in the top-right corner to display the Administration Dashboard
  2. Scroll down to the Members heading, and click on Logins in the far-right Database tables column

  3. On the Logins Administration page, click the button to update the login record of the person holding this role
  4. Ensure that their Access Level is set to at least Data Administration Access
  5. If their Access Level is set to Data Administration Access, then you must ensure that at least the following databases are selected from the set of tickboxes below the drop-down list:
    • Members
    • Memberships
    • Order/invoice items
    • Orders/Invoices
  6. Click Save at the bottom
  1. Ensure all members have a "Fee Schedule"

The final step in setting up member invoicing is to ensure that each member that is to be invoiced has at least one "fee schedule".  A fee schedule is a record that comprises (at least):

  • Expiry date
  • Fees payable (Full, student, associate, life, etc)
  • Fees schedule (payment frequency - annually, quarterly, etc)

...and the Fees payable/Fees schedule combination must be a non-zero value (see step 1, above).

Note that it is possible (but not necessarily common) for each member to have more than one concurrent schedule of fees.  Each schedule can be completely independent of any other schedules for that member, including the level of fees paid, how frequently they get paid, and their expiry date.  This might be useful if you have more than one ensemble in your organisation, each one with its own independent set of fees, and some members participate in more than one ensemble.  Now you can set up a separate schedule for each ensemble that a member participates in.  Or you may invoice your members quarterly for their club/chapter fees, as well as invoicing them annually for some other sort of fees, like membership with a larger association, or insurance, or similar.

To create a fee schedule for any member, simply visit that member's profile page, and locate the box entitled Fee Schedules...

Then click the Add new fee schedule button, and fill in the blanks.

Of course, you'll likely want to create fee schedules for most of your members, and the schedules will likely all be the same, or similar.  So there's a way to create multiple fee schedules at once...

  1. Click on the Admin link in the top-right corner to display the Administration Dashboard
  2. Scroll down to the Financials heading, and click on the Financial Members Report link to the right of this in the Admin Pages column
  3. At the top of the page, ensure that Financial Members (or whatever member grouping you use to designate members that pay fees) is selected from the dropdown list, and the tickbox underneath it is ticked:

  1. The lower part of the page will have the heading Members that can't be invoiced - usually because they have no fee schedules.  It might look like this...

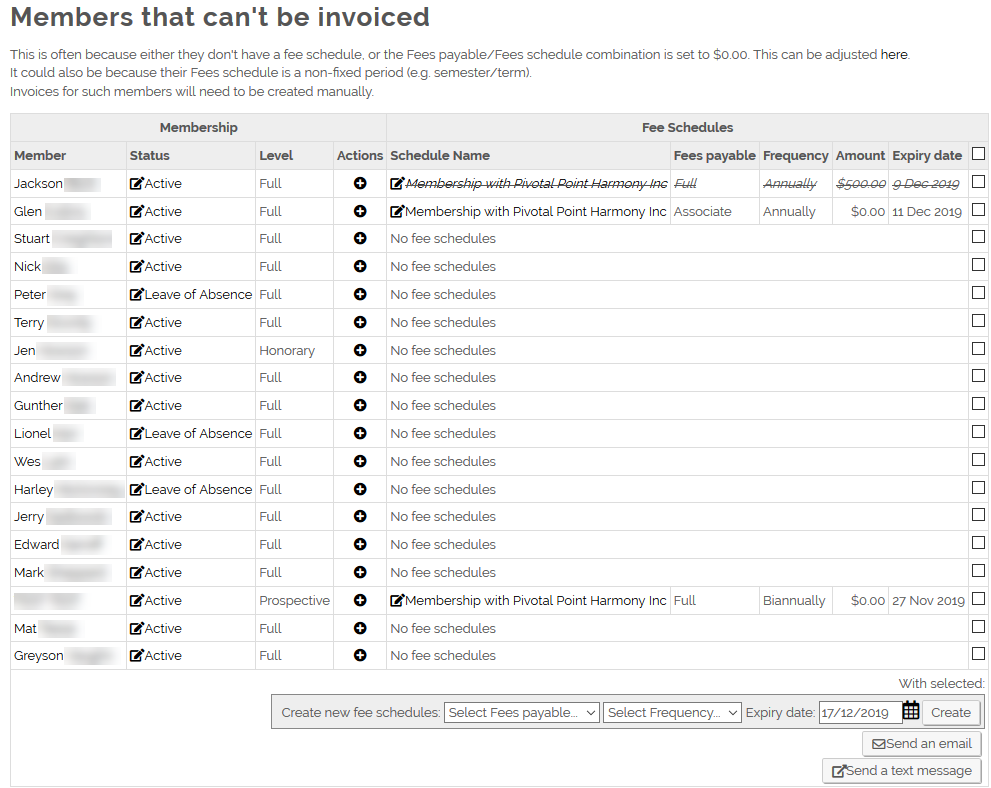
  1. You can use the tickboxes on the right to select which members you'd like to create fee schedules for.  Note that all the people you select will get the same fee schedule (same amount payable regularly)!   If some of the members are to have different fee schedules, then do them in a separate batch.
  2. Once all the members are selected (have ticks in their boxes), scroll down below the list, and do the following...
  • Select a Fees Payable from the drop-down list
  • Select a Frequency from the drop-down list
  • Enter an Expiry date (or click the calendar icon and choose a date from a pop-up calendar).  This date will be the date that the selected members are currently paid up to - before they get issued with their first invoice.
  • Click the Create button.  The system will create fee schedules for each selected member.  When the page automatically refreshes, those members should have moved into the first list at the top of the page - meaning that they can now be invoiced
  1. Repeat steps 5 & 6 for members who are to have fee schedules that are different from the first batch.
  1. Customising Fee Schedules

If you want to make changes to any one fee schedule, click the name of the fee schedule in the list, as highlighted below...

Things you might want to change are highlighted in the image below...

Specifically, you can change the following...

  • Fee schedule name - Typically the schedule gets a generic name, such as "Membership with [club/chapter name]". But you can change that to anything you want, to make it more descriptive. No need to include the member's name as part of the fee schedule name.
  • Active/Inactive - You can make a fee schedule inactive without actually deleting it, in case you need it at some point in the future.
  • Custom amount - You can select a Fees payable of Custom and enter an amount. This could be useful if the member has a special arrangement with your group, where they pay an unusual amount for their regular fees, particular to just that member. Entering a custom amount here means that you don't have to add a special fee structure to the fixed set of membership fees.
  • Send invoices to a different member - This is just what it sounds like - one member's fees can be paid by some other member, all grouped together on the same invoice, if required.  Simply nominate the other member from the drop-down list.
  • Admin Notes - in case you need to add any special notes about this fee schedule.

So it's possible to end up with any combination of fee schedules for any one member, even a complete set like this...

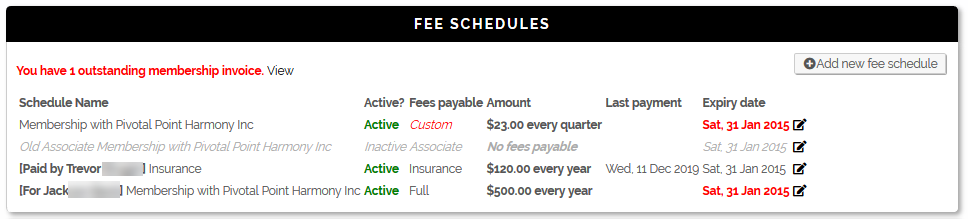
That completes the set-up of the member-invoicing module.  Everything from now on (the regular creating and sending of invoices, and marking them as paid) is quite simple...


See also 

Termly and non-traditional fee structures

Creating and managing invoices

Gift Aid reporting

If you cannot find what you are looking for in our help guides or have any questions just get in touch


Creating and managing invoices

Create Invoices for Members

Creating invoices for members is now a trivial process...

  1. Click on the Admin link in the top-right corner to display the Administration Dashboard
  2. Scroll down to the Financials heading, and click on the Financial Members Report link to the right of this in the Admin Pages column
  3. The members listed in the first list on that page can be invoiced automatically.  This list is sorted so that most out-of-date members are listed first (or if no members are out-of-date, then those next for renewal are listed first).  Tick the box in the right-hand column that corresponds to each member for whom invoices should be created and emailed.
  4. Click the button at the bottom of the list called Create and Send new invoices.  An invoice will be generated for each ticked member, and automatically emailed to them if they have an email address.
  5. To review the invoices that got created, click the date in the Outstanding Invoice(s) column.  The address of that page is what gets emailed to each member.  The page contains the details of each payment method that has been configured.

Mark an Invoice as Paid

When an Internet bank transfer or a cheque is received, it is necessary to mark the invoice as paid in the system, so that the member's membership details can be automatically updated.

There are two ways of doing this...

  1. Click on the Admin link in the top-right corner to display the Administration Dashboard
  2. Scroll down to the Financials heading, and click on the Financial Members Report link to the right of this in the Admin Pages column
  3. Locate the invoice that has just been paid, and click on the green tick next to it to mark it as paid.

Or...

  1. Click on the Admin link in the top-right corner to display the Administration Dashboard
  2. Scroll down to the Financials heading, and click on the View all Orders/Invoices/Bookingslink to the right of this in the Admin Pages column
  3. Locate the invoice that has just been paid, and click on the green tick next to it to mark it as paid.

In either case, the member's membership record is automatically updated with their new expiry date and date last paid (today).  Also, an email is sent to them informing them of their updated membership (assuming this option is enabled).

Termly and non-traditional fee structures

You can invoice members for their membership fees quickly and automatically with Making Music Platform. (For information on the technical aspects of invoicing members, please see the Setting up Member Invoicing help guide above).

Automatic membership invoicing is simplest if your members pay a fixed fee at regular periods (e.g. monthly, weekly, quarterly). However, if your group’s fee structure doesn’t work this way, it may still be possible for you to customise the automatic invoicing feature to work for you.

Termly invoicing

Making Music Platform creates automatic invoices for regular payment periods (e.g. monthly, weekly, quarterly). This can raise an issue for groups which invoice termly, as often music groups terms are not all the same length and don’t begin at regular points in the calendar year.

It’s still possible to send automatic invoices if your fees are paid termly. However there are some things to be aware of:

  • All ‘terms’ in the MM Platform system must be the same length of time. E.g. if you have three terms in the year, then each term will be exactly four months long. If you have two semesters, each semester will be exactly six months long and so on.
  • For groups with three terms, this usually means that their term dates in the Making Music Platform system will be:
    • Term 1: 1 September – 31 December
    • Term 2: 1 January – 31 April
    • Term 3: 1 May – 31 August

Even if these dates don’t correspond to the group’s active periods.

This doesn’t have to cause a problem for your group - you can click the ‘Invoice now’ button on your MM Platform and send out invoices for the next dues period whenever you want. You’re not forced to invoice members on (e.g.) 1 Sep, 1 Jan, 1 May. However, members will find that the period printed on their invoices corresponds to the one in the MM Platform system. I.e. their invoice will say that it is for the period 1May – 31 August even if your actual term dates are different from this.

Non traditional fee structures 

Your group might have a more complex fee structures, for example you have several ensembles, and members pay a different amount based on how many ensembles they attend. In these cases you need to create a set of Fee Levels which reflect all the possible amounts that your members could owe.

We’ve written two examples of this below. If you have any questions about how your group’s fee structure could be made to work with the automatic system, please get in touch.

  • Example 1. A choir runs three sessions each week. Each session costs the same amount, but members who attend more than one session receive a discount. This group could have the following fee levels:

One session only

£10

Two sessions only

£18

Three sessions

£26

  • Example 2. A group has two ensembles: a main band and a training band. Some members play in the main band only, some play in the training band, and some play in both. The group has a discount for students. This group could have the following fee levels:

Main band

£15

Main band (student discount)

£12

Training band

£10

Training band (student discount)

£8

Main and training band

£25

Main and training band (student discount)

£20


Ad hoc invoicing

There may be occasions where you need to invoice for a one off payment (not membership fees) and the Platform allows you to do this through the Ad hoc invoicing functionality. This can be found by people who have data admin permissions over the finances of the Platform or webmasters by going to the Admin dashboard area of the Platform. Under the finances section click on Ad hoc invoicing which will take you to the following screen:

You can then select the individuals you would like to send an invoice to or manually enter their details if they are not currently in the member database. If you add an email address for that individual/they already have one listed in the member database then the invoice will be emailed straight to them. If the individual does not have an email address listed then you can view and print their invoice via the orders/invoices/bookings page via the Admin dashboard once the invoice has been created.

Once the recipients details have been added you can then include the information about what the invoice is for.

Once ready click the create and send invoices button.

Gift Aid reporting

If you claim Gift Aid on your membership subscriptions, Making Music Platform can simplify your admin work through a feature called the Gift Aid Report.

This guide is for groups who are already claiming Gift Aid on membership subscriptions. If your group isn’t then read How to claim Gift Aid for your group to find out more.

If you claim Gift Aid on your membership subscriptions, you can continue to do so when you invoice members through Making Music Platform. Platform will even do most of the work for you in creating your Gift Aid return. This feature is called the Gift Aid Report, and it requires that you have enabled Member Invoicing on your Platform (see user guide: Setting up Member Invoicing).

Setting up the Gift Aid module

First log into your Platform and go to Website Setup and Configuration (click the cog icon in the top right corner of your Making Music Platform).

Click the top ‘Settings’ cog in the table: this will bring up a page titled Making Music Platform Details.

In your Making Music Platform Details, click on the ‘Payments’ tab. Scroll almost to the end of the page, until you see a box labelled ‘Gift Aid allocation’. Enter the percentage of your membership fee that is eligible for Gift Aid (i.e. the % you decided from your tuition calculations.)

Defining whose subs are eligible for Gift Aid

To claim Gift Aid on a member’s subscription that member must have signed a Gift Aid declaration form.

You can record which members have agreed to Gift Aid their subscriptions as part of the individual’s Membership Details. Membership Details are easy to update from your Memberships Administration page (found via ‘Admin’ – ‘Memberships’).

From your Memberships Administration, look for the member whose subs you would like to Gift Aid in the table of members. Click the ‘edit’ icon to the right of their name. You should be taken to a page titled Membership Details’.

Scroll down the page until you reach the subheading ‘Financials’. At the bottom of that section you should see a question: ‘Allocate a percentage of fees to Gift Aid?’.

  • Enter in the dates between which the member has agreed for you to claim Gift Aid.
  • The ‘From’ date can be the date they signed their Gift Aid declaration.
  • If their Gift Eligibility is ongoing – leave the ‘To’ date empty – an empty field means the members is currently eligible for gift aid.
  • If the member stops being eligible for Gift Aid update the ‘To’ field at this point.

Payments made outside of the date range that you enter for this member, will not be shown in your final Gift Aid Report.

You will need to input these dates for every member whose subs you intend to claim Gift Aid on.

However, if you give us these dates with your membership data when you apply for Making Music Platform then we can import it for you.

Invoicing members and recording subscription payments

You can read more about invoicing and accepting payments through Making Music Platform above.

The important thing to know here is that in order to create a Gift Aid report on Making Music Platform, you must have at least one eligible payment recorded on Making Music Platform.

Creating a Gift Aid report

Go to your Gift Aid page (found in ‘Admin’ – ‘Financials’ section). Enter in the date range for the subscriptions that you want to include and click ‘show’. If you have any eligible payments, you will see a list of them. You can download this report for your own records: it’s designed to use the formatting you are required to use when making a Gift Aid claim to HMRC.


SELLING MERCHANDISE

Setting up Your Making Music Platform to Sell Merchandise

For all the set-up instructions below, ensure that you are logged into your Making Music Platform with a "Webmaster" level of access.

1.  Enable the Order module and set up payment options

Before merchandise can be sold from your website, the Order module must be enabled.  You must also select at least one payment method.  The payment methods available are:

  • Credit card via a secure payment gateway. When a vistor uses this option to pay for their order, they remain on your website for the entire process (unlike PayPal, below). Making Music Platform currently has integrated support for Stripe. Please refer to our Payment Gateways page for more information.
  • Credit card via PayPal.  Note that your group must have a PayPal account in order to enable this payment method.  These are free to set up, but note that PayPal takes fees on every transaction.
  • Internet Bank Transfer. Your bank account details are displayed to visitors when they check out. They make a manual transfer via their own Internet banking system, and when your merchandise manager sees the payment in your group's bank account, they then manually mark the order as paid, and the goods can be shipped.
  • Cheque/Money Order.  Your postal address is displayed to members when they received their invoice. They post a cheque, and when your merchandise manager receives it, they then manually mark the order as paid, and the goods can be shipped.

To enable the order module and set up payment options...

  1. Click the "cog" icon in the top-right corner of the site
  2. On the Website Setup and Configuration page, click the cog icon next to "Making Music Platform"
  3. Click the Configuration tab
  4. Tick the box at the top of the tab called Online Invoices/Orders/Tickets/Donations
  5. Tick the box at the top of the tab called Merchandise
  6. Click the Payments tab
  7. Enter the details of at least one payment method.  For example, the bank account instructions may look something like this...

    Please pay funds into the following account:

    Bank: First Bank of Making Music
    BSB: 123456
    Account name: My Excellent Group Inc.
    Account number: 12345678

    ...while the cheque/money order instructions may look like this...

    Please make cheques payable to My Excellent Group Inc.
    and post to:

    My Excellent Group Inc.
    PO BOX 9876
    Mytown SA 1234

  8. If you wish to allow visitors to pay for merchandise securely using a credit card, please refer to our Payment Gateways page for more information
  9. Click Save at the bottom

2.  Nominate the person/position responsible for handling orders

In most groups, there is one person that is responsible for purchasing merchandise, as well as being notified of new orders.  In Making Music Platform, you must nominate who this person is before invoices can be sent.  This is done by selecting the "position" that the person holds, not the person themselves.  That way whenever a new person takes over that position, the system continues to function without modification.

It may be necessary to first create the "position" and assign a member to it.  Check the Officers or Management Team page (or look in the "Positions" database).  If the position doesn't exist, create it.  Ensure that a member is assigned to it.  Then...

  1. Click the "cog" icon in the top-right corner of the site
  2. On the Website Setup and Configuration page, click the cog icon next to "Making Music Platform"
  3. Click the People tab
  4. In the Receive merchandise purchase notifications drop-down list, select the appropriate position
  5. Click Save at the bottom

Next, ensure that this person has administration rights over the merchandise database...

  1. Click on the Admin link in the top-right corner to display the Administration Dashboard

  2. Scroll down to the Members heading, and click on Logins in the far-right Database tables column

  3. On the Logins Administration page, click the button to update the login record of the person holding this role
  4. Ensure that their Access Level is set to at least Data Administration Access
  5. If their Access Level is set to Data Administration Access, then you must ensure that at least the following databases are selected from the set of tickboxes below the drop-down list:
    • Merchandise
    • Merchandise categories
  6. Click Save at the bottom

3.  Ensure that your merchandise is correctly set up

Now it's time to actually add the products that you wish to sell on your website.  Visit the Merchandise page, usually found in the Other menu across the top of the page.  If you can't see it there, it may be in one of the other menus. If not, please contact us.

If everything has been set up correctly, then when you visit the Merchandise page you should see no errors - perhaps just the message "There are no items to display".  There should also be some links at the top of the page that allow you to add new items and new merchandise categories.

Merchandise Categories

Every item that you make available for sale must be "categorised" - must be assigned a category.  Some sample categories have been added to your system to get you started...

  • DVDs
  • CDs
  • Clothing
  • Memorabilia

You can delete any of these categories, or rename them, or add new ones, or reorder existing ones.  To do so, visit the Merchandise Categories Administration page, by selecting Merchandise Categories from the Administration drop-down list on the Members page.

Adding Items/Products

Once the categories have been set up, you can start adding products.  Simply visit the Merchandise page and click the Add new item link at the top of the page.  Fill in the details of the item, then click Save at the bottom, and you're done!

Some notes about entering items...

  • Options.  Some of the items you sell will have "options" associated with them. The Making Music Platform system supports a maximum of two "options" per product.  The best way to describe what an "option" is by example:  If you're selling a T-shirt with your logo on it, then you will probably sell that T-shirt in different sizes.  You may also sell different colours.  If that's the case, then your T-shirt will have one option called "size" and another called "colour".  When ordering, your visitors will be required to specify the size and colour that they want. It's up to you to list all the "size" options and "colour" options when adding the T-shirt item.  Where it says Option set 1, you might specify the name "size", and then, in the box below (called Options), list all the sizes available, each on a line by itself.  Where it says Option set 2, you would specify the name "colour", and then list every colour available, each on a line by itself.
  • Photos.  You can upload at most two photos per item.  Be very careful about the size (dimensions in pixels) of the photos you upload.  If you upload photos that are too large (bigger than around 500 pixels wide), then it will upset the look of the page.
  • Description.  The Full Description field can contain whatever you want - even more photos.  For example, if you were selling a CD, the Full Description field could contain the tracklist.

Once you have added all your products, you're ready to sell them immediately!

Viewing orders that have been placed

Your website contains a report for viewing orders that have been placed. To access this report, proceed as follows:

  1. Click on the Admin link in the top-right corner to display the Administration Dashboard

  2. Scroll down to the Financials heading, and click on the View all Orders/Invoices/Bookings/Donations link to the right of this in the Admin Pages column 

The page you are taken to will have a section for all orders placed.  You can easily view the details of each order (by clicking on the order ID).  You can also...

  • Update the details of each order
  • Delete the order
  • Send out the latest status of the order to the person that placed the order
  • Mark the order as "paid".  This is necessary when you receive the payment for an order by cheque or Internet bank transfer.

This report will be enhanced in the near future.

Please remember that if you are selling CD's or making any musical content available online then you may need a licence. More information about this can be found in our copyright resource


DONATIONS

Setting up Your Making Music Platform to Accept Donations

For all the set-up instructions below, ensure that you are logged into your Making Music Platform with a "Webmaster" level of access.

1.  Set up payment options

There is no "donations module" that needs to be "switched on" in Making Music Platform. It's virtually ready to go - you just need to ensure that you have one or more payment methods set up.

Before donations can be accepted via your Making Music Platform, you must select at least one payment method.  If you are already using the Membership Invoicing module, the Merchandise module or the Event Ticketing module in your Making Music Platform, then you will most likely have already set up payment methods, and should not need to change them.

The payment methods available are:

  • Credit card via a secure payment gateway. When a visitor uses this option to pay for their order, they remain on your website for the entire process (unlike PayPal, below). Making Music Platform currently has integrated support for Stripe. Please refer to our Payment Gateways page for more information.
  • Credit card via PayPal. Note that your group must have a PayPal account in order to enable this payment method. These are free to set up, but note that PayPal takes fees on every transaction.
  • Internet Bank Transfer.  Your bank account details are displayed to visitors when they check out.  They make a manual transfer via their own Internet banking system, and when your merchandise manager sees the payment in your group's bank account, they then manually mark the order as paid, and the goods can be shipped.
  • Cheque/Money Order.  Your postal address is displayed to members when they received their invoice.  They post a cheque, and when your merchandise manager receives it, they then manually mark the order as paid, and the goods can be shipped.

To enable the order module and set up payment options...

  1. Click the "cog" icon in the top-right corner of the site
  2. On the Website Setup and Configuration page, click the cog icon next to "Making Music Platform"
  3. Click the Configuration tab
  4. Tick the box at the top of the tab called Online Invoices/Orders/Tickets/Donations
  5. Tick the box at the top of the tab called Event Tickets
  6. Click the Payments tab
  7. If you haven't already done so, enter the details of at least one payment method.  For example, the bank account instructions may look something like this...

    Please pay funds into the following account:

    Bank: First Bank of Making Music
    BSB: 123456
    Account name: My Excellent Group Inc.
    Account number: 12345678

    ...while the cheque/money order instructions may look like this...

    Please make cheques payable to My Excellent Group Inc.
    and post to:

    My Excellent Group Inc.
    PO BOX 9876
    Mytown SA 1234
      

  8. If you wish to allow visitors to pay for their donations securely using a credit card, please refer to our Payment Gateways page for more information.  If you wish to use the "Stripe" payment gateway (recommended), then there is a page in your Making Music Platform to set this up quickly and easily.  Visit your main Members page, then look for the link called Connect to Stripe Payment Gateway, and follow the instructions there.

2.  Nominate the person/position responsible for handling donations

In most groups, there is one person that is responsible for receiving donations. In Making Music Platform, you must nominate who this person is before donations can be accepted  This is done by selecting the "position" that the person holds, not the person themselves.  That way whenever a new person takes over that position, the system continues to function without modification.

It may be necessary to first create the "position" and assign a member to it.  Check the Officers or Management Team page (or look in the "Positions" database).  If the position doesn't exist, create it.  Ensure that a member is assigned to it.  Then...

  1. Click the "cog" icon in the top-right corner of the site
  2. On the Website Setup and Configuration page, click the cog icon next to "Making Music Platform"
  3. Click the People tab
  4. In the Receive donation notifications drop-down list, select the appropriate position
  5. Click Save at the bottom

Next, ensure that this person has administration rights over the "donation targets" database (more about what that is below)...

  1. Click on the Admin link in the top-right corner to display the Administration Dashboard
  2. Scroll down to the Members heading, and click on Logins in the far-right Database tables column
  3. On the Logins Administration page, click the button to update the login record of the person holding this role
  4. Ensure that their Access Level is set to at least Data Administration Access
  5. If their Access Level is set to Data Administration Access, then you must ensure that at least the following databases are selected from the set of tickboxes below the drop-down list:
    • Donation Targets
    • Order/invoice/booking/donation items
    • Orders/Invoices/Bookings/Donations
  6. Click Save at the bottom

3.  Set up Donation Targets

Making Music Platform can support multiple types of donations - even in the same shopping cart. For example, you may wish to accept one type of donation for your group's own funds, and also accept donations on behalf of your favourite charity, or disaster-relief campaign, etc. Each one of these can be set up as a separate "donation target".

One donation target has been set up already for you, called Support [MyGroupName].  You can add further donation targets as you need them. Each one can be marked "active" or "inactive". Each one has a description field, the contents of which are displayed wherever donations are configured to appear on your website. Each also has an optional "suggested donation amount" (e.g. $20), to make it even easier for your website visitors to donate to you.

To create, update or delete donation targets, the steps are:

  1. Click on the Admin link in the top-right corner to display the Administration Dashboard
  2. Scroll down to the Financials heading, and click on the Donation targets link in the far-right Database tables column
  3. On the Donation Targets Administration Page, you can either:
    1. Create a new donation target.  Simply click the Add new donation target button in the top-right corner, and fill in the blanks
    2. Edit or delete existing donation targets.  In the list of donation targets, locate the relevant donation target, and click either the "update" or "delete" icons

4.  Display a "Donate" box (or page) on your website

The only thing left to do is to decide where you want to display the "Donate" box to your site visitors so that they can complete the donation process.  You have three choices (you can choose as many of these as you want):

  1. In the "sidebar" of many public-facing pages - in the same part of the page as "Search the site", "Join our Mailing List" and the Facebook wall.
  2. In the "footer" area of many public-facing pages (including the home page) - in the same part of the page as the "Site Map", "Upcoming Events" and "Contact Us" sections.
  3. On a separate page of its own.

Note that in options 1 and 2, only the first active donation target can be used (based on the Rankingfield). So if you have more than one active donation target, only the first one can be displayed in either the site's sidebar or footer.  If you want to present your visitors with options to donate to all of your donation targets, you'll need to use option 3.

Here's how to set up each one...

To set up the Donate box in either the sidebar or footer...

  1. Click the "cog" icon in the top-right corner of the site
  2. On the Website Setup and Configuration page, click the cog icon next to "Making Music Platform"
  3. Click the Footer/Sidebar tab
  4. Scroll down to either the Footer or Sidebar section, depending on where you want the Donate box to go
  5. In the Footer items (or Sidebar items) field, you'll see Donations in the right-hand column.  Click on it to move it over to the left-hand column, thus "enabling" it.  You can also drag and drop it to its correct position relative to the other items in the footer (or sidebar)
  6. Click Save at the bottom
  7. Visit any public-facing page that has a footer (or sidebar) to see the result

To enable the Donations page, you simply need to create a link to it. This can be either a "navigation link" (if you want the link to the new page to appear in the site menu across the top of the page) or a regular link on a page.

If you want to create a new "navigation link" (for the site menu), then this can be done in the normal way that navigation links are created.  The new page is called simply Donate. If you're not comfortable with the Navigation Links system, then contact us and we'll do it for you.

If you want the link to the new Donate page to be placed on the page of your choice, then create the link in the normal manner. The address of the new page is

http://www.YOURGROUPNAME.com/dbpage.php?pg=donatehs

Again, if you're not comfortable setting up such links, contact us and we'll do it for you.

Site visitors can now donate to your target(s) and pay their donations using your built-in shopping cart system.

Viewing donations that have been made

Your website contains a report for viewing all invoices/orders/bookings/donations in the system - all on the one page. To view this page, proceed as follows:

  1. Log in to the Members Area and click on the Admin link in the top-right corner to display the Administration Dashboard

  2. Scroll down to the Financials heading, and click on the View the Orders/Invoices/Bookings/Donations link to the right of this in the Admin Pages column  

The page you are taken to will have a section at the bottom for all donations made.  You can easily view the details of each donation (by clicking on the donation ID). You can also...

  • Update the details of each donation
  • Delete the donation
  • Send out the latest status of the donation to the person that made the donation
  • Mark the donation as "paid".  This is necessary when you receive the payment for an order by cheque or Internet bank transfer.

This report will be enhanced in the near future.


FINANCES FAQS

Creating discounts for event booking fees and merchandise

The Platform allows you to create your own discount codes to be used by anyone buying merchandise or event tickets. To create discount codes you will need to go to the Admin dashboard and under the financials section click on the Discount codes button:

To create a new discount click on the add new discount code button:


From here you can create a new discount code, select the permission level required to use the discount code and also the amount the code is worth (either a percentage off of the fee or a total amount in GBP).

Once your newly created code has been saved then anyone buying merchandise or booking event tickets in your Platform can take advantage of this discount code.

Can we take direct debit payments through the Platform?

Unfortunately, you cannot set-up direct payments through the Platform. Each payment that you take will need to be made individually.

Our payment gateways compared

This table compares the payment gateways that Making Music Platform supports.

  Stripe PayPal
Set-up fee none
 
none
Set-up time Around 10 minutes
 
Around 10 minutes
Transaction fee
percentage
1.5% 3.4% 
Transaction fee
additional
70p 20p
To set up an account 1.  Log into your Making Music Platform as a webmaster.
2.  On the Admin Dashboard, scroll down to the Financials heading, and click on  the Connect to Stripe
Payment Gateway 
link to the right of this in the Admin Pages column.
3.  On the Connect to Stripe Payment Gateway page, click on the Connect with Stripe button, and fill out your details. Click the Authorize access to this account button at the foot of the page when you're done.
Set up a PayPal account at www.paypal.com,
then:
1. Log into your Making Music Platform as a webmaster.
2. Click on the cog icon at the top-right of the page to take you to the Website Setup and Configuration page.
3. Click on the "cog" icon next to Making Music Platform.
4. On the Making Music Platform Details page, click on the Payments tab.
5.  Scroll down to the PayPal account/email address field and enter your PayPal account name.
 
Ease of Use The site visitor (the person making the payment) never leaves your group's website.  A simple pop-up appears asking for credit card details.
 
The visitor is taken AWAY from your website to the PayPal website, where they are obliged to log in or create an account, and THEN make the payment, and then return to your site.
Retrieval of received funds Funds are automatically transferred to your nominated bank account a couple of days after the payment is received.
 
You need to periodically log into your PayPal account and manually initiate a transfer of funds to your bank account.


Why does MM/Harmonysite charge an extra 50p for Stripe payments?

As HarmonySite has built the whole financial sub-system of the Making Music Platform (Merchandise, event tickets, member invoicing and donations), and made it available to Making Music Platform users for no extra charge, the extra surcharge is the way HarmonySite is compensated for that.


We hope you find this Making Music resource useful. If you have any comments or suggestions about the guidance please contact us. Whilst every effort is made to ensure that the content of this guidance is accurate and up to date, Making Music do not warrant, nor accept any liability or responsibility for the completeness or accuracy of the content, or for any loss which may arise from reliance on the information contained in it.