Making Music Platform allows for easy editing of web pages, but it's not immediately obvious how to add images to your pages. Nor is it clear how to prepare the image, or what the issues involved may be. The guide helps explain all that.
Preparing your image
The most important preparation step is to ensure that your image is of the correct size for your web page. By "size" we mean the image's dimensions, in pixels. By way of example, a typical photo straight out of a digital camera is perhaps 8 Megapixels. This means that its dimensions will likely be something like 3200 x 2400 pixels. Now, the content area in a typical web page is usually no more than 600 pixels wide. As you can see, an 8 Megapixel photo is going to be several times larger than the entire page that it's sitting on. So the photo needs to be resized first!
You can use just about any image-editing or photo-editing programme or app to resize an image. They're all different, but they all provide resizing functionality. I'll leave that part for you to figure out. Just ensure that the photo is no wider than 600 pixels (usually - unless you have special circumstances).
Uploading the image
Once the image is of the correct size, you need to upload it to the page. Here are the steps involved...
- Log into your website as an administrator
- Visit the page that the image is to be added to
- Click the edit button in the bottom corner of the page:

- Click the Content tab
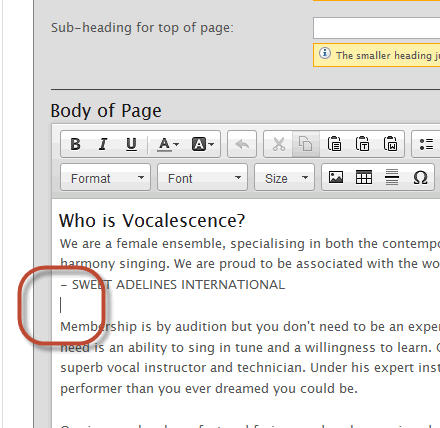
- In the big Body of Page box, click on the text where you want the new image to be inserted:

- Click the Image button on the toolbar:

- The Image Properties box appears. Click the Upload tab
- Click the Browse or Choose File button (whichever your browser offers), and then locate the image on your own computer. Double-click the image on your own computer to load it into the Image Properties box:
- Click the Send it to the Server button
- There may be nothing more to do. At this point, you can click the OK button, and the image will be inserted into the page. However, there may be some customisations required, so read on...
- You should not need to adjust the width/height fields. As described above, you should have made the image the correct size before you uploaded it to the web page.
- Optionally add an image description to the Alternative Text field
- Optionally specify the thickness of the images Border, in pixels. A thickness of 1 should be sufficient (or none at all)
- Hspace and Vspace govern how many pixels of padding - vertically and horizontally respectively - should be inserted around the image, between the image and its surrounding text. Optionally insert some numbers here, such as 15 and 10.
- Optionally choose an Alignment. If you don't, the image will be treated just like a word of text, appearing in a paragraph as if it was a word. This is the default behaviour, and if you want the image to be on a line by itself, then you don't need to choose an Alignment. However, if you would like the image to appear on the left of the text, with the text wrapping around the image to the right, then choose Left. If you would like the image to appear to the right of the text, with the text wrapping around the image to the left, then choose Right.
- If you would like the image to be "clickable", and when the user clicks the image, they are taken to a different page or a different website, then click the Link tab and enter the address of the page they should be taken to when they click the image.
- Click the OK button to return to the page editor
- When you are done making changes to the page, click the Save button at the bottom. Your image is now on your page:


